Using Telephony Dev Box
Crosspost Note
This originally appeared on MojoLingo's Blog.
Using Vagrant For Telephony Development Environments
Vagrant is a wonderful Open Source tool that automates downloading a base OS virtual image, setting it up for what you need, and sharing access into the machine with your local computer. From simply running a single service in a virtualized box you don’t want to install on your own machine, to building complete sandboxes for a complex app to run inside, Vagrant makes setting up an environment a breeze.
This post talks about using the Telephony Dev Box to set up a Ruby box with some gems and Asterisk or Freeswitch – but Vagrant could easily be used to make your life easier no matter what app you’re developing.
Intro to Telephony Dev Box
Telephony Dev Box (affectionately referred to as TDB) is a Vagrant environment that lets you get started writing voice applications right away (preferably in Adhearsion, without wasting a month of Saturdays learning which mods to include or not when compiling FreeSWITCH from source, or how to configure a SIP peer on Asterisk.
Boxes provided by TDB:
- Adhearsion – Free & Open Source!
- Asterisk – Free & Open Source!
- FreeSWITCH – Free & Open Source!
- PRISM – this comes with an evaluation license for 2 ports, but you may need an additional license from Tropo
- LumenVox TTS & ASR – note that to use this you will still need a LumenVox license key
Installation
VirtualBox
Before you install Vagrant, you’ll need to install VirtualBox. Download and install the version for your system from the VirtualBox website.
Vagrant
Vagrant has recently switched to being installed like via an installer, like other end-user tools.. Just go the Vagrant Download page and download/run the appropriate installer for your system.
Get the Telephony Dev Box and start it up
These steps are taken straight from the TDB README.
- First, clone the repo:
git clone git://github.com/mojolingo/Telephony-Dev-Box.git - Next, you’ll need to install a Vagrant plugin to automatically download the provisioning scripts:
vagrant plugin install vagrant-librarian-chef - Now you can bring up the Vagrant virtual machines. From within the Telephony-Dev-Box checkout directory, simply typing
vagrant up— but note that this will bring up 4 virtual machines! Most people won’t need this. You’ll probably only need one telephony engine and possibly the adhearsion box. So we’ll bring up just those:vagrant up freeswitch && vagrant up adhearsionwill get it started. - Now we wait. The first time you
vagrant up, vagrant will download the image needed to base the box on. The PRISM box uses a CentOS base image, but the other 3 boxes all use an Ubuntu box. Even though it’s used in multiple Vagrant VM’s, vagrant is smart enough to only download it once, so after it downloads once, subsequent Vagrant runs will be faster. Between the download and running all the provisioning scripts as it creates the new images, this step will take a while. - Profit! You now have FreeSWITCH set up! And you didn’t have to worry about a single .xml file or development header. You might want to make sure it’s running – type
vagrant ssh freeswitchto go inside the machine, and dops aux | grep freeswitchto ensure it’s running – if not, dosudo /etc/init.d/freeswitch startto fire it up before exiting out of the VM.
Use the Telephony Dev Box to connect an application
Since Adhearsion itself doesn’t have too many tricky dependencies, I prefer to run Adhearsion apps on my Mac instead of inside a virtual machine, but for the sake of this guide we’ll run the app inside.
- 1) First, let’s go inside the adhearsion box with
vagrant ssh adhearsion - 2) Get to the shared directory with
cd /vagrant - 3) Let’s use adhearsion to create a new application –
ahn create testapp - 4)
cd testapp && bundle installwill ensure we have all the gems we need. - 5) Now you can open the testapp directory outside of the VM with your favorite editor – since it’s shared, any changes made on one side will affect the other side instantly.
- 6 Edit
testapp/config/adhearsion.rbto point to the FreeSWITCH we’ve started:
  config.punchblock.platform = :freeswitch
  config.punchblock.password = "ClueCon"
  config.punchblock.host = "freeswitch.local-dev.mojolingo.com"
- 7) Inside the VM, you can
ahn start .to fire up Adhearsion, which should successfully connect to the FreeSWITCH instance inside the VM.
Connect a SIP softphone
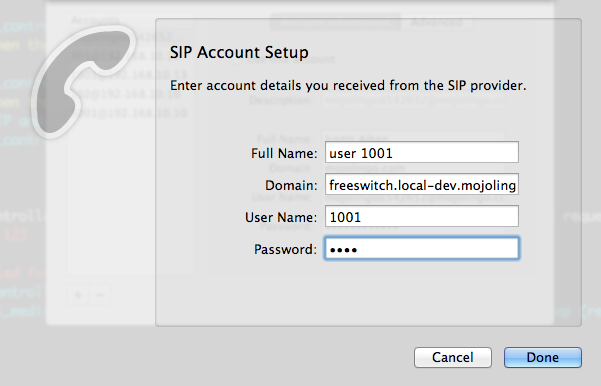
There are plenty of options for software VoIP phones you can use – Blink and Bria are popular choices at Mojo Lingo, while I personally tend to use the free/open-source Jitsi. For this post though, we’ll use Telephone, since it’s about as simple as you can get.
Install the software, and then go to set up a new account. TDB sets FreeSWITCH up with users 1001-1010, all with the password 1234. The freeswitch domain is freeswitch.local-dev.mojolingo.com, so set it up like this:
Make some voice magic happen!
Now that you have a blank slate app connected to a telephone engine, do something unique and innovate!
Conclusion
Next time you pick up a project where you are going to need lots of dependencies to run the application, such as RabbitMQ, graphite, an XMPP server, an indexing service, or a telephony engine, don’t sigh and start looking for brew packages and writing Foreman scripts; just find a Vagrantbox to do all that for you so you can focus on what we like to – write code to create software!
Other Resources
- The Telephony-Dev-Box README is also a good source of up-to-date information
- Railscast #292 gives a nice intro to Vagrant
- Railscast #293 covers setting up nginx or unicorn with Vagrant
- Can’t decide which telephony engine to
vagrant up? Maybe this comparison by Ben Langfeld will help!
You might also enjoy reading:

I'm a Ruby/Rails developer currently working for UserTesting, living in Southern Utah. More about the author →